–Opengl 超级宝典我已经决定放弃不看了,太尼玛坑了,为了运行个Demo,去捣鼓作者的工具类库,但是这本书可是面向小白的,工具类库又是各种恶心的问题不能用,要有一定经验的人才能解决,简直本末倒置~

so~ 我决定看 Opengl 编程指南了, 目前看到第六章感觉良好~
Opengl的配置不打算开新贴了,直接挤在这里~
第六章的Demo blendeqn.c 是Opengl的混合模式,里面用到了glBlendEquation API 这是Opengl的API,因此要么使用 glutext 扩展,要么直接使用 glew 我选择后者。 可是在编译的时候,各种找不到 glew 的相关定义,造成这种问题的一般都是 dll 或者 lib 的位置问题。
于是我按照网上的教程放它们

.h文件放到 VS/VC/include 中
.lib 放到 VS/VC/lib 中
.dll 放到 system32 中

结果编译项目,还是符号错误。 之后我在 glew 的 binary 文件中有看到 x64的版本。 我估计可能我是 win7 x64系统,就必须用x64版本的glew. 于是 .dll 文件就丢到了 SYSWOW64 目录下,结果编译失败。一番寻找,让我在 VS/VC/lib 目录下居然找到了个 amd64 的目录(真坑) 把 .lib 丢到 这个目录下。 终于未知定义的错误没了。 但是给我弹出 找不到符号的错误,在各种系统相关的dll中, 搜索了一番,这个还算好解决 直接 VS菜单 调试 -> 选项和设置 -> 常规 -> 打勾源服务器支持 / 调试 -> 选项和设置 -> 符号 -> Microsoft符号服务器 。 之后编译项目,还是报错 0xc000007b 错误。 最后的最后,我考虑下只有一种可能性了。
glew 的包中提供了 win32 和 win64 的2个版本,之前是 win64 丢到 syswow64 , win32 丢到 system32 目录下。这一次, 我把 glew 的win32中的文件,也丢到 syswowo64 下, 终于编译成功了。。总之,好坑~~

这里是华丽的分割线———————

最近在从stage3D转向到opengl开发,于是入手了 Opengl超级宝典第五版。 结果SB5 工具库各种恶心的环境搭建,耗费了3个多小时,最终放弃。 于是转向用 第四版学习。

进度蛮顺利的,第一天就看到第四章 (跟stage3D大同小异,API的变种版本而已,很多都是跳着看的)

结果编译 transformGl 的时候出错了。

这2个API 报错

gltDrawTorus
m3dRotationMatrix44

error LNK2019: 无法解析的外部符号 “void __cdecl gltDrawTorus(float,float,int,int)” (?gltDrawTorus@@YAXMMHH@Z),该符号在函数 “void __cdecl RenderScene(void)” (?RenderScene@@YAXXZ) 中被引用

看到这个就知道是函数没有具体实现的问题,于是到 shared 里做文档内部搜索
最后发现 gltDrawTorus 的实现在 gltools.cpp 里,m3dRotationMatrix44 的实现在 math3d.cpp 里,果断将这2个cpp引入到项目中,之后继续编译出现新的错误

gltools.obj : error LNK2001: unresolved external symbol _pglCreateShaderObjectARB
gltools.obj : error LNK2001: unresolved external symbol _pglCreateProgramObjectARB
gltools.obj : error LNK2001: unresolved external symbol _pglLinkProgramARB
gltools.obj : error LNK2001: unresolved external symbol _pglShaderSourceARB
gltools.obj : error LNK2001: unresolved external symbol _pglGetObjectParameterivARB
gltools.obj : error LNK2001: unresolved external symbol _pglAttachObjectARB
gltools.obj : error LNK2001: unresolved external symbol _pglDeleteObjectARB
gltools.obj : error LNK2001: unresolved external symbol _pglCompileShaderARB

=。= 真是命运多舛

于是一口气全部在项目中定义掉,终于编译成功

M$[TT~HOWND`MS]SXJYN~6D

like this

PFNGLCREATEPROGRAMOBJECTARBPROC glCreateProgramObjectARB;
PFNGLDELETEOBJECTARBPROC glDeleteObjectARB;
PFNGLUSEPROGRAMOBJECTARBPROC glUseProgramObjectARB;
PFNGLCREATESHADEROBJECTARBPROC glCreateShaderObjectARB;
PFNGLSHADERSOURCEARBPROC glShaderSourceARB;
PFNGLCOMPILESHADERARBPROC glCompileShaderARB;
PFNGLGETOBJECTPARAMETERIVARBPROC glGetObjectParameterivARB;
PFNGLATTACHOBJECTARBPROC glAttachObjectARB;
PFNGLGETINFOLOGARBPROC glGetInfoLogARB;
PFNGLLINKPROGRAMARBPROC glLinkProgramARB;
PFNGLGETUNIFORMLOCATIONARBPROC glGetUniformLocationARB;
PFNGLUNIFORM4FARBPROC glUniform4fARB;
PFNGLUNIFORM1IARBPROC glUniform1iARB;

好了,先去爽下 “Watch Dog” !

传说中的上帝之光

实际上 上帝之光有2种实现方式
1.真的光
2.使用阴影体

阴影体的Demo 在前两篇文章里就有了。
本文是使用真实光来做

直接上Demo

具体做法,参考Demo中的左上角两张Debug图。

将所有遮挡物和光圈都渲染到纹理
然后在片段着色器中判断像素的颜色,是光圈则加亮,不是光圈则设置为无像素,有时候某些材质的颜色会近似光圈颜色,因此在渲染遮挡物的时候,直接将它们的Color输出为0即可,只需要它们的轮廓。
将光圈渲染到纹理并混合之前的轮廓纹理图,这样就能制造出被遮挡的光圈(残缺的光圈), 同时根据光圈的位置,对光圈的像素做指向性衰减像素采样。
最后和主场景的RTT混合即可。

ps: 原本想做HDR的, 但是10张的RTT性能实在是坑不起,还是算了。 过几天把这个GodRay 整合到之前的水体反射里看看效果。

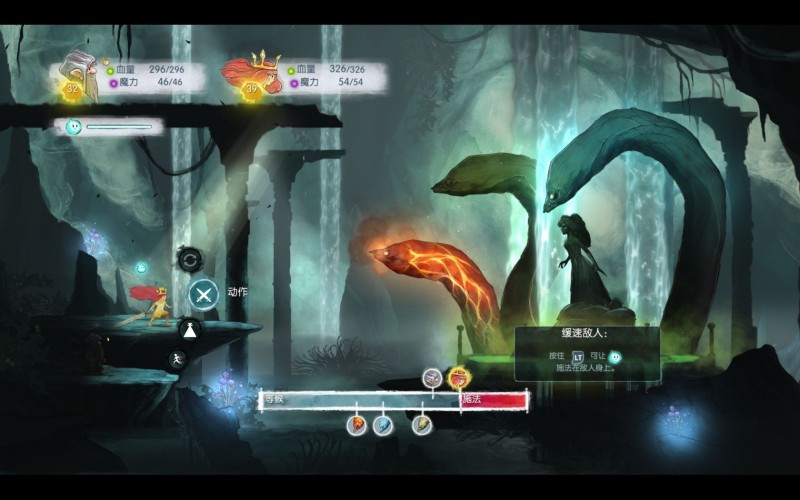
childoflight

休刊,休刊!
哈哈~光之子,应该是今年最赞的2D游戏了,音乐也是最高的说~~ 话说最近又是游戏荒啊,蜘蛛侠肯定是个坑就不玩了。 下下周就是独角兽最终话啦。

AGAL2

After a bit of a start and stop first round, the Adobe team recently stated that they were back and working on the AGAL2 specification, a feature that was previously available in an earlier beta version of the Flash player, but later dropped but a feature set that I had been eagerly awaiting.

Anyone who joined us at the last Stage3D online conference will have seen the Adobe Flash team showing off some of the great new player features, which included demonstrations of AGAL2 in action, amongst other features. Today, I’m really excited to see that the new beta player is available for download and the AGAL2 features will be available publicly in the next iteration, which is scheduled for public release next month. Meanwhile, we can download the latest beta player from Adobe labs:


What’s new in AGAL2?

AGAL2?offers a set of additional features that can be used to improve the visual fidelity of rendering output in your Stage3D projects. This means that Flash graphics are about to got a lot sexier. Features such as MRT help to increase the speed of rendering by referencing multiple render to target textures from within a single shader pass, we have additional features and memory space.?So what can you expect to be playing with? Here is a quick overview of some of the new features:

  • Multiple Render Texture (MRT)
  • Anisotropic filters
  • Conditional forward jump
  • Increases in register space
  • Floating point textures (RGBA_HALF_FLOAT)
  • Partial derivatives (ddx, ddy)
  • Fragment depth (od)
  • Texture anti-aliasing


Multiple Render Targets (MRT)

MRT is a feature that will allow a shader to access a number of addressable render targets. This is useful when considering the concepts used in deferred rendering. Deferred rendering is a technique in which multiple images are rendered sequentially and then those images are composited back into a final result. The memory space used during this process is often referred to as the GBuffer and will contain channels such as; albedo, light, normals, depth etc. There are a number of advantages to this technique, perhaps most notably, the ability to render lights to an independent light map, which is then combined with the scene accordingly.

deferred-shading


Anisotropic Filtering

Anisotropic filtering is used to improve the artifacts that are caused by viewing a surface at an oblique angle. The image below illustrates the difference in output quality where the texture on the right is being anisotropically filtered.

anisotropic-compare

To make use of this feature is very simple. A new sampler parameter is now available that can be placed within a tex operation as such:

tex ft0, v0, fs0 <2d,anisotropic8x,miplinear,wrap,dxt1>

The anisotropic sampler parameters can be any of the following:

  • anisotropic2x
  • anisotropic4x
  • anisotropic8x
  • anisotropic16x


Conditional Forward Jump

If you are familiar with an?if?statement, you are already well equipped to dealing with conditional jumps on the GPU if you’ve used that with an?else?statement, then you’re really ready to roll. Prior to this, AGAL required various hacks to achieve similar functionality with branching that required checks against register data. The conditional flow controls of AGAL2 allow for execution of shader code upon a particular condition. These operations are:

  • IFE – (if equal)
  • INE – (if not equal)
  • IFG – (if greater than)
  • IFL – (if less than)
  • ELS – (else)
  • EIF – (else if)

Collectively they serve to provide developers with more granular control over the flow of their shader programs but I must add a quick note to say they should be used judiciously. Using conditional statements inherently means that you will be using more operations, which can impact the performance of your shader code. That being said, conditionals are great when used to simplify workflow and their advantages often outweigh the negative performance hit. It’s probably wise to see what works best and monitor execution speed of your shaders. There is always Adobe Scout or Intel GPA etc for such tasks?;)


Increased Register Space

In the previous AGAL spec, we had access to the usual set of registers. Vertex and fragment registers were made available, allowing us to intermediately store resources and make them available to the programmable graphic pipeline. Whilst this is exactly the same with AGAL2, the amount of memory that each shader can access has been increased. Here is a chart that shows a comparison between the numbers of available registers.

AGAL Resisters

We can see from the table that we have access to well over double the number of registers on most registers. Possibly the two most notable would be the number of tokens that can be used, which directly translates to the overall size of your shader programs, and the VC register. My guess is that the large increase of the VC register is balanced like this for one important reason, bone animation. Bone animations are used for manipulating vertices, the technique is also known as skinning, and requires that either matrices or quaternions are uploaded to the GPU via the VC register. The original AGAL spec was quite limited in this regard but the increase means that more than double the number of bones can be uploaded, offering the ability to produce more detailed animations.


Half Time Conclusion

Well, that’s half way!?We can see that Adobe are really bringing exciting and much awaited set of features and?whilst many of them are nothing new to the 3D community, it’s important to realize that the emphasis for Adobe is on platform reach. Adobe are seemingly striving to provide cross platform GPU support to as many users as possible by offering subsets of features that target as many GPU chipsets as possible. In this regard, it makes complete sense that the Flash Player team are trying to ensure that Stage3D doesn’t need to fall back on its software rendering mode and the result of that is a good overall experience to the end-users.


引用:http://plugin.io/agal2-is-here/

对于水来说,应该具备下列的特征

  • 全反射,所有的物体都应该能被反射到,除了反射表面自身
  • 基于角度的反射
  • 深度穿透,近距离的水更加透明,远距离的水更加浑浊
  • 加入水纹或者水面法线

对于本文来说只实现前面2点

1.1视差
如果你之前渲染引擎使用单个pass,那么从现在开始,你需要至少2个passes(实际上至少是 N+1, N为可见的反射物体数量)

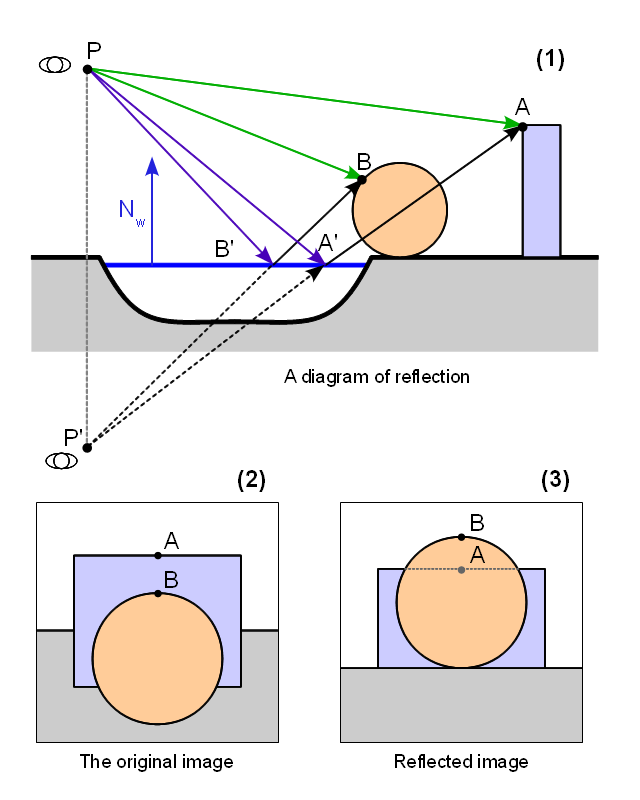
原因是,我们无法复用主场景的纹理用来反射。首先是因为视锥体可能非常大(比如,观察水表面从一个非常高的角度,我们只能在主场景中看到地面和水,还有被反射的大部分的天空)。 第二是因为视差,很不幸的是反射并不是主场景的完美复制,只是从不同的视觉位置的场景反射。下面的图表现了这个观点。

reflections

这意味着你需要渲染到纹理,我们将要渲染反射到纹理,然后使用这个纹理来渲染我们主场景的水面

因此,要得到反射纹理,我们首先需要通过反射相机来渲染我们的场景 如之前图中的 P` 位置。 首先我们需要找到反射相机的位置,或者更精确的说,相机矩阵的反射(因为我们还需要相机的角度), 我们能通过下面的算法得到反射矩阵

M’camera = Mreflection * Mcamera

Mreflection 是镜面反射矩阵,它能直接计算出基于平面一个点的反射

| 1-2Nx2 -2NxNy -2NxNz -2NxD |
Mreflection = | -2NxNy 1-2Ny2 -2NyNz -2NyD |
| -2NxNz -2NyNz 1-2Nz2 -2NzD |
| 0 0 0 1 |

(Nx,Ny,Nz,D) 是平面的方程 (xNx + yNy + zNz + D = 0) 的系数, 注意: (Nx, Ny, Nz) 也是这个平面的法线向量

Mcamera 是相机的矩阵变换, 在场景中也起着法线的功能, 要获取 ModelView 矩阵,你还需要将相机矩阵翻转

AS的计算函数如下
[cc lang=”actionscript3″]
//计算平面投影矩阵,n为平面法向量,p为平面上一点
public static function getReflectionMatrix(n:Vector3D,p:Vector3D):Vector.{
n.normalize();
var d:Number=-n.dotProduct(p);

var raw:Vector.=Vector.([-2*n.x*n.x+1,-2*n.y*n.x,-2*n.z*n.x,0,
-2*n.x*n.y,-2*n.y*n.y+1,-2*n.z*n.y,0,
-2*n.x*n.z,-2*n.y*n.z,-2*n.z*n.z+1,0,
-2*n.x*d,-2*n.y*d,-2*n.z*d,1]);
return raw;
}
[/cc]

1.2 镜面几何体
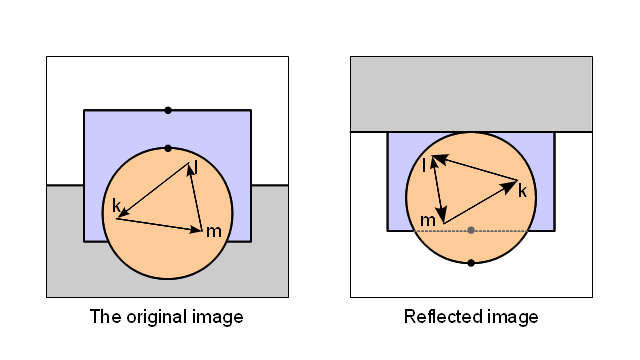
事实上,在之前的图形中,我们作弊了,我们旋转了镜面纹理180°使得它与原始图更相似,使得视差的效果能被看到。实际上,镜面图应该看起来像这样。

注意:球型物体的排序顺序在反射贴图中被翻转了,因为三角形顺序在主场景中是逆时针,但在反射中是顺时针

这对于你来说并不是问题,如果你所有的材质都是双面渲染的(比如,你不切除后表面) 或者如果你能设置以类似的方reflections-2式渲染管线。
这样你就能改变剔除方向。在我的例子中,我尽量设置双面都不剔除, 所以所有的东西都会出现在反射纹理中,反则一些几何体不会被渲染。

我们将要开发一个功能,使得相机总是(至少在大多数应用中)与视觉方向成直角并且处于中央,因此我们近需要翻转相机的Y轴方向然后改变渲染顺序就行(在翻转反射纹理后,看起来像 第一张图片中的 (3) 部分).
我们能再通过一个反射矩阵来实现

M”camera = Mreflection * Mcamera * Mflip

1.3 水下翻转
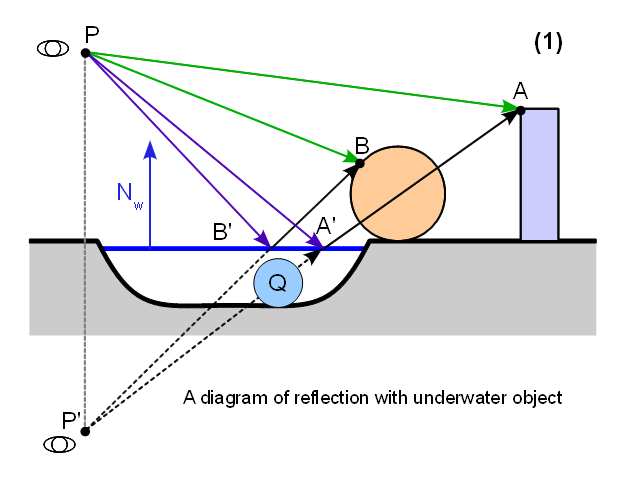
看看下面这张图

reflections-3

我们加入一个水下物体Q到我们的场景中,现在它应该不会出现在反射中,因为因为它不会阻挡射线 PB’B 和 PA’A. 但是我们并没有做射线追踪。 我们通过移动相机到镜像位置 P’ 然后像一般纹理一样渲染反射。 但是如你所见,对象Q阻挡了射线 P’A’A 因此物体Q会出现在我们的反射中

因此我们需要确定,任何物体在反射平面(水面)之下的都不能出现。我们能通过下面3种方式来实现。

1.在GPU中使用额外的裁切面。这可能非常快,也可能非常慢,取决与你的图形卡。
2.在反射渲染中使用斜投影矩阵,你可以在 http://www.terathon.com/code/oblique.html 了解它的相关知识。这是一个非常cool的技术,但是它在远平面中的相机中表现的并不好。
3.手动修剪 Pixel Shaders. 这会浪费一些GPU的循环,但是却非常简单。

我选择使用方法3,因为斜投影矩阵并没有看起来那么好,当相机的角度很大(远平面都变成一个非常奇特的效果)。 剪裁功能非常容易加入到下面的代码中,在所有的 Pixel Shaders 开始之前(更确切的说是用在所有的反射物体上)

[cc lang=”actionscript3″]
//float clipPos = dot (interpolatedVertexEye, clip_plane.xyz) + clip_plane.w;
dp3 result.x eyePos.xyz plane.xyz
add result.x result.x plane.www
//if (clipPos < 0.0) {
// discard;
//}
slt ifReg.x result.x fc0.x //fc0.x == 0
[/cc]

你必须计算顶点Shader(将顶点坐标转换到视野坐标下 VertexEye = Mmodelview * Vertex)中计算平面到视角的差值. 如果你不要裁剪,只要设置 clip_plane 法线(xyz) 为0. 这样所有的像素都会被渲染

1.4 把一切都合并起来
在开始主渲染pass之前(提前或者推迟)做下列这些事

1.创建一个需要被反射的渲染列表(参数为它们的反射面)之后 for each 反射面:
2.计算反射相机矩阵 M”camera = Mreflection * Mcamera * Mflip
3.设定相机矩阵(你可以通过使用翻转投影矩阵来优化,但是在这里不适用)
4.设置裁剪面到反射平面
5.渲染整个场景
6.保存反射纹理应用到反射物体上

如果你使用HDR, 你就不要用使用色调投影到反射纹理上,除非你想做一些非常奇特的效果。

2.渲染反射物体
这一步非常的简单,确保你掌握了所有必须的参数。你还需要决定哪一个 render stage 来做这些事。我使用Transparent.
这样水面就是基于一个场景的透明表面。但是你可以增加一些其他的pass在之前或者之后。

你需要掌握这些
反射相机矩阵 M”Camera
投影矩阵你需要渲染反射 Mprojectionreflection(通常是和你的主相机是使用的同一个矩阵)
反射纹理

2.1 顶点Shader
参数
vertex3D vertex;
Matrix3D o2v_projection;
vertex3D interpolatedVertexObject;

m44 vt0 02v_projection vertex3D(vertex.x,vertex.y,0.1)
interpolatedVertexObject = vt0

我们在这里增加了一个约束,水面在物体本地坐标系中是属于 XY 平面。 它不是确实不是必要的如果你有适当的反射平面,但是我发现这样做起来更容易。仅仅使用XY平面作为反射平面然后适当摆放你的物体(水体)

事实上,有另一个很酷的诀窍,我们可以使用水体的底部作为我们的水体。它将会在Shader中被扁平化,我们可以使用 Z data 来检测水中点的深度。 这部分以后再说。

o2v_projection 仅仅是 Projection * modelView 矩阵的名称。 我喜欢这样给矩阵命名,这样跟助于记忆, 使用它们所描述的坐标系统。 比如 Object To View * Projection

interolatedVertexObject 仅仅是顶点坐标在本地空间的坐标系统,我们将需要在反射纹理中看到它。

2.2 Fragment Shader
参数
matrix3D o2v_projection_reflection
sampler2D refletion_sampler
vertex3D interpolatedVertexObject

vClipReflection = o2v_projection_refletion * vectex(interpolatedVertexObject.xy,0.0,1.0);
//设备反射
vDeviceReflection = vClipReflection.st / vClipReflection.q
//纹理反射
vTextureReflection = vec2(0.5,0.5) + 0.5 * vDeveiceReflection;
//反射纹理颜色
reflectionTextureColor = texture2D(reflection_sampler, vTextureReflection);

//反射纹理的Alpha 可能 > 1
reflectionTextureColor = 1.0;

mov oc reflectionTextureColor

o2vProjection_reflection 是 Projection * ModelView 矩阵, 用来在反射期间进行渲染

Mprojectionreflection * (M”camera)-1 * Mobject

如名字表现的,这是将物体空间坐标系统转换到切面坐标系统的反射相机
在fragment shader 中,我们仅仅重复了整个完整的变换管线在反射渲染中。 渲染然后使用2D坐标系采样。要做到这样,我们首先需要初始化和为转换的顶点物体坐标,因此他们被差值通过vertex shader(interpolatedVertexObject)

设置反射alpha 为 1 因为我使用了 HDR 缓冲,因此它的的 alpha 最终会变成一个非常奇怪的值

Continue reading