=。= 很久没更新博客,偷懒了好久。 受某损友的影响接触到 quick-cocos2dx. 一个使用lua来编写游戏的框架,我使用的内核版本是 cocos2dx 2.1.5。 嘛~ DreamFairy 又是初次接触Lua, 于是决定边查Lua API手册边写一个横版过关游戏。
游戏的原型是 Allen Tan 的文章 http://www.raywenderlich.com/24155/how-to-make-a-side-scrolling-beat-em-up-game-like-scott-pilgrim-with-cocos2d-part-1原游戏是使用 objective-c 编写的IOS游戏教程
国内也有同学写了一篇C++ 的教程
http://blog.csdn.net/akof1314/article/details/8549150
so~ 我来搞一个lua版本的教程
本游戏的代码已开源,包含游戏资源
git地址
https://github.com/dreamfairy/PrompaLua
1.进入 quick-cocos2dxbin 目录,使用CMD打开create_project.bat 输入 cn.dreamfairy.prompalua 该包名创建项目
2.删除Demo项目文件MainScene.lua
3.修改 Config.lua 添加一些游戏的资源信息
Config.lua 内容:
[cc lang=”lua”]
— 0 – disable debug info, 1 – less debug info, 2 – verbose debug info
DEBUG = 2
DEBUG_FPS = true
— design resolution
CONFIG_SCREEN_WIDTH = 640
CONFIG_SCREEN_HEIGHT = 960
–资源
CONFIG_ROLE_SHEET_IMAGE = “pd_sprites.pvr.ccz”
CONFIG_ROLE_SHEET_FILE = “pd_sprites.plist”
–地图
CONFIG_TILEMAP_FILE = “pd_tilemap.tmx”
— auto scale mode
CONFIG_SCREEN_AUTOSCALE = “FIXED_WIDTH”
[/cc]
4.创建 GameScene.lua scenes.GameScene
[cc lang=”lua”]
require(“config”)
local GameScene = class(“GameScene”, function()
return display.newScene(“GameScene”)
end)
function GameScene:ctor()
end
return GameScene
[/cc]
这里创建游戏的主场景,之后我们的游戏场景层和UI层都会丢到这个场景上来,类似于AS中的stage节点
5.修改 game.lua 初始化一下我们的 SpriteFrame
game.lua 内容:
[cc lang=”lua”]
require(“config”)
require(“framework.init”)
— define global module
game = {}
function game.startup()
CCFileUtils:sharedFileUtils():addSearchPath(“res/”)
display.addSpriteFramesWithFile(CONFIG_ROLE_SHEET_FILE,CONFIG_ROLE_SHEET_IMAGE)
game.enterMainScene()
end
function game.exit()
CCDirector:sharedDirector():endToLua()
end
function game.enterMainScene()
display.replaceScene(require(“scenes.GameScene”).new(), “fade”, 0.6, display.COLOR_WHITE)
end
[/cc]
display.addSpriteFramesWithFile 可以通过plist 文件初始化 spriteFrame. 对于创建的API如果是 createWithImage 等没有标明是取SpriteFrame的话,需要在文件名前标明 #号来区分是从plist配置表中,还是从文件系统中加载文件。 比如 #HelloWorld.png 就表示从 plist中取出 HelloWorld.png 这个key 来创建.
6.创建 define.lua
Define.lua 内容:
[cc lang=”lua”]
SCREEN_SIZE = CCDirector:sharedDirector():getWinSize()
CENTER = ccp(SCREEN_SIZE.width/2,SCREEN_SIZE.height/2)
ACTION_STATE_NONE = 0
ACTION_STATE_IDLE = 1
ACTION_STATE_ATTACK = 2
ACTION_STATE_WALK = 3
ACTION_STATE_HURT = 4
ACTION_STATE_KNOCKOUT = 5
BoundingRect = {
actual,
original
}
Define 中创建一些全局变量,比如屏幕大小,中心点,动作状态,包围盒等信息
7. 创建包 scenes.layers
8. 在包 scenes.layers 中创建 GameLayer.lua
GameLayer.lua 内容:
[cc lang=”lua”]
require(“config”)
require(“scenes.define”)
local GameLayer = class(“GameLayer”, function()
return display.newLayer()
end)
local TileMap
local Hero
function GameLayer:ctor()
Actors = display.newBatchNode(CONFIG_ROLE_SHEET_IMAGE)
self:addChild(Actors,1)
self:initTileMap()
self:initHero();
end
function GameLayer:initHero()
end
function GameLayer:initTileMap()
TileMap = CCTMXTiledMap:create(CONFIG_TILEMAP_FILE)
self:addChild(TileMap,0)
end
return GameLayer
[/cc]
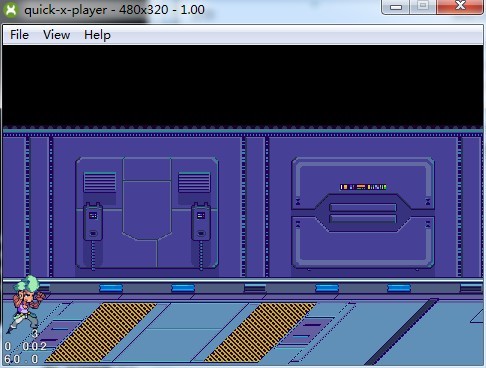
创建英雄的API先留空,使用 CCTMXTiledMap 来创建我们的 Tiled 地图。 到这步为止运行游戏效果如图

之后我们来创建英雄,但在此之前我们先创建活物的基类,因为这个基类不止是英雄要用到,机器人也需要用到,内部有许多函数都可以复用
9.创建包 scenes.GameObjects
10.创建 ActionSprite.lua
ActionSprite.lua 内容:
[cc lang=”lua”]
require(“scenes.Define”)
local ActionSprite = {}
function ActionSprite:extend()
local o = o or {}
setmetatable(o,self)
self.__index = self
return o
end
function ActionSprite:getName()
return self:getName()
end
function ActionSprite:idle()
local ActionState = self:getActionState()
if ActionState ~= ACTION_STATE_IDLE then
self:stopAllActions()
self:createIdleAction()
local action = self:getIdleAction()
self:runAction(action)
ActionState = ACTION_STATE_IDLE
self:setActionState(ActionState)
end
end
function ActionSprite:attack()
local ActionState = self:getActionState()
if ActionState ~= ACTION_STATE_ATTACK then
self:stopAllActions()
self:createAttackAction()
self:runAction(self:getAttackAction())
ActionState = ACTION_STATE_ATTACK
self:setActionState(ActionState)
end
end
function ActionSprite:hurtWithDamage(damage)
end
function ActionSprite:knockout()
end
function ActionSprite:walkWithDirection(direction)
local ActionState = self:getActionState()
local Velocity = self:getVelocity()
local WalkSpeed = self:getWalkSpeed()
if ActionState == ACTION_STATE_IDLE then
self:stopAllActions()
self:createWalkAction()
self:runAction(self:getWalkAction())
ActionState = ACTION_STATE_WALK
self:setActionState(ActionState)
end
if ActionState == ACTION_STATE_WALK then
Velocity = ccp(direction.x * WalkSpeed, direction.y * WalkSpeed)
self:setVelocity(Velocity)
if Velocity.x >= 0 then
self:setScaleX(1)
else
self:setScaleX(-1)
end
end
end
function ActionSprite:update(dt)
local ActionState = self:getActionState()
local Velocity = self:getVelocity()
if ActionState == ACTION_STATE_WALK then
local DesiredPosition = ccpAdd(ccp(self:getPositionX(),self:getPositionY()),ccpMult(Velocity,dt))
self:setDesiredPosition(DesiredPosition)
end
end
return ActionSprite
[/cc]
由于lua 中是没有面向对象的概念的,但是我们可以使用其 Prototype 的概念来间接实现面向对象 (由于初次写Lua,对Lua的面向对象的写法并不熟悉,有问题请PM我修正的说)
就像这样,将创建一个空对象,并设置该对象的table设置为当前类的table.这样就复制出了当前类的属性和方法
[cc lang=”lua”]
function ActionSprite:extend()
local o = {}
setmetatable(o,self)
self.__index = self
return o
end
[/cc]
在 idle(),walk(),attack() 函数中每次 stopAllActions() 后,都必须要重新创建当前要使用的 Action
这是在C++中可以调用 cocos2dx 的垃圾回收机制,保留当前的动作引用不被回收,但是lua中无法实现该功能,因此之前的动作会被清除,必须重新创建了。
11.创建 Hero.lua 在包 scenes.GameObjects 中
Hero.lua 内容:
[cc lang=”lua”]
require(“scenes.Define”)
local Hero = class(“Hero”, function()
return display.newSprite(“#hero_idle_00.png”)
end)
local Prototype = require(“scenes.GameObjects.ActionSprite”):extend(Hero)
–Animation Cache
local HERO_IDLE = “heroIdle”
local HERO_ATTACK =”heroAttack”
local HERO_WALK = “heroWalk”
–attribute
local WalkSpeed
local Damage
–measurements
local CenterToSide
local CenterToBottom
function Hero:ctor(name)
WalkSpeed = 80
self.HurtPoint = 100
Damage = 20
CenterToSide = 29
CenterToBottom = 39
self.Name = name
end
function Hero:getName()
return self.Name
end
function Hero:getClass()
return Prototype
end
function Hero:update(dt)
Prototype.update(self,dt)
end
function Hero:createIdleAction()
local frames = display.newFrames(“hero_idle_%02d.png”,0,6)
local animation = display.newAnimation(frames,1/12)
display.setAnimationCache(HERO_IDLE,animation)
self.IdleAction = CCRepeatForever:create(CCAnimate:create(animation))
end
function Hero:createAttackAction()
local frames = display.newFrames(“hero_attack_00_%02d.png”,0,3)
local animation = display.newAnimation(frames,1/24)
display.setAnimationCache(HERO_ATTACK,animation)
local idelFunc = CCCallFunc:create(function() self:idle() end)
self.AttackAction = CCSequence:createWithTwoActions(CCAnimate:create(animation),idelFunc)
end
function Hero:createWalkAction()
local frames = display.newFrames(“hero_walk_%02d.png”,0,8)
local animation = display.newAnimation(frames,1/12)
display.setAnimationCache(HERO_WALK,animation)
local idelFunc = CCCallFunc:create(function() self:idle() end)
self.WalkAction = CCRepeatForever:create(CCAnimate:create(animation))
end
function Hero:getWalkSpeed()
return WalkSpeed
end
function Hero:getCenterToSides()
return CenterToSide
end
function Hero:getCenterToBottom()
return CenterToBottom
end
function Hero:getDesiredPosition()
return self.DesiredPosition
end
function Hero:setDesiredPosition(param)
self.DesiredPosition = param
end
function Hero:getActionState()
return self.ActionState
end
function Hero:setActionState(param)
self.ActionState = param
end
function Hero:getVelocity()
return self.Velocity
end
function Hero:setVelocity(param)
self.Velocity = param
end
function Hero:getWalkAction()
return self.WalkAction
end
function Hero:getAttackAction()
return self.AttackAction
end
function Hero:getIdleAction()
return self.IdleAction
end
function Hero:idle()
Prototype.idle(self)
end
function Hero:attack()
Prototype.attack(self)
end
function Hero:walkWithDirection(direction)
Prototype.walkWithDirection(self,direction)
end
return Hero
[/cc]
使用英雄待机图的第一张来创建英雄的默认样子
display.newSprite(“#hero_idle_00.png”)
之后创建一个 Prototype 成员来继承 ActionSprite
local Prototype = require(“scenes.GameObjects.ActionSprite”):extend(Hero)
实现 Hero:createIdleAction 等 三个Action, 并将Action存储到 Prototype 的父级对象中
12.在GamaLayer中补充创建英雄的代码
在 function GameLayer:initHero() 中填充如下
[cc lang=”lua”]
function GameLayer:initHero()
Hero = require(“scenes.GameObjects.Hero”).new(“Hero”)
self:addActors(Hero)
Hero:setPosition(Hero:getCenterToSides(),80)
local x, y = Hero:getPosition()
Hero:setDesiredPosition(ccp(x,y))
Hero:idle()
end
[/cc]
GamLayer 已经初始化好了,现在可以将GameLayer添加到GameScene上了
GameScene.lua 中完整的代码现在为
[cc lang=”lua”]
require(“config”)
local GameScene = class(“GameScene”, function()
return display.newScene(“GameScene”)
end)
local GameLayer = require(“scenes.layers.GameLayer”).new()
function GameScene:ctor()
self:addChild(GameLayer)
end
return GameScene
[/cc]
之后运行程序就可以看到英雄在场边发呆了
..to be continued